It is often after emptying the Windows or macOS recycle bin that we realize that the files it contained were ultimately important. By acting quickly, and with the right tools, it is possible to recover them.
No one is immune to mishandling. You think you're getting rid of an unnecessary Word document, duplicate photo, or uninspiring PDF, and suddenly you panic: it wasn't the right file. For those who make regular backups using, for example, the Windows File History tool (read our practical sheet Automatically backing up files with Windows 10) or with Time Machine on macOS, getting back control of items deleted by mistake does not take only a few seconds. On the other hand, for those who have not taken these precautions, the blow is hard and can represent hours of work gone up in smoke ...
All hope is not lost, however. As long as you act quickly! This is because when you empty the trash in Windows or macOS, the files it contained are not really deleted. The system just crosses them off its index and declares the space they occupied on the internal or external disk or a USB stick as vacant to accommodate other data. This is precisely the problem, especially with the disk where the system is installed. Any data - including the tools you can install to recover those deleted items! - can take this available space. Also, it is better to respect a few rules before acting. First, if the files are on the system drive, use another PC or Mac to download the recovery software that we recommend. Then, since these tools do not require installation, copy them to a USB stick (formatted as FAT 32 or NTFS for Windows or MacOS Extended Journaled for macOS). It will suffice to connect this key on the machine where the files to be recovered are hidden and to launch the utility from the key. A good way to avoid overwriting precious data. Finally, to avoid these manipulations in the future and to anticipate a possible disaster, install these tools on the disk of your computer - after this first rescue operation of course. They will then be ready for use for the next awkwardness.
Note that the operations described here will not be of any help to you in the event of a severe failure of the disk of your computer or of the medium on which the files to be saved are saved.If it is no longer recognized by the system, if the sectors are damaged or if the disk experiences a physical failure, the tools implemented here will not work. Better to turn to other more powerful utilities but also requiring more in-depth computer knowledge such as TestDisk capable of recovering lost partitions or restoring corrupted partition tables for example.
How to recover data on PC with Recuva?
There is no shortage of data recovery software on Windows. However few offer the possibility of operating from a USB key (in portable version) while not opposing any limit in the amount of recoverable data for free. Recuva is one of them. Not only is it free, it is also very easy to use, even if it is in English.
- First, download the portable version of Recuva. If the data to be recovered is on the system disk (the one that hosts Windows), use another PC for this first step so as not to overwrite the files on which you just want to get your hands on.
Download Recuva Portable for Windows
- Unzip the archive in Zip format, then copy its contents to a USB drive formatted in FAT32 or NTFS.
- Connect the USB key to the PC containing the files to be recovered. Launch Recuva directly from the USB stick. Click on Next in the first window.

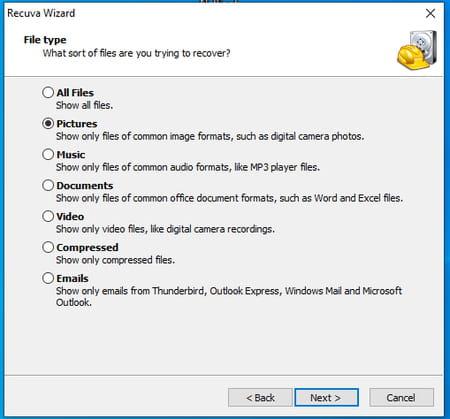
- On the next page, set the type of files you want to recover: All files for all files, whatever they are, Pictures for images, Music for music, Documents for text files, tables or even PDFs, Videos for video files, Compressed for archive files (Zip, rar, etc.) or even Emails for files from Outlook, Thunderbird, or Windows Mail. Click on Next when your choice is made.
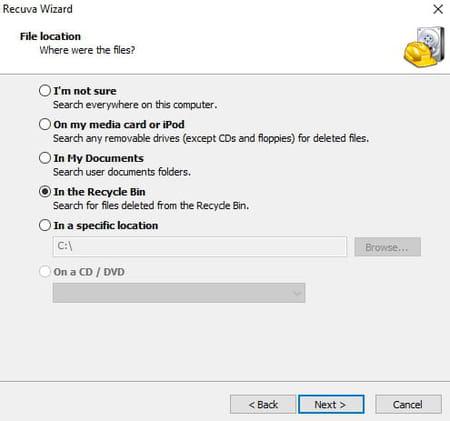
- Now you need to indicate where you think the files you are looking for are located. If you are convinced that you have put them in the trash, choose Recycle bin. Otherwise, choose a location from the options provided. If you don't know, leave the box checked I'm not sure (I am not sure). Click on Next.
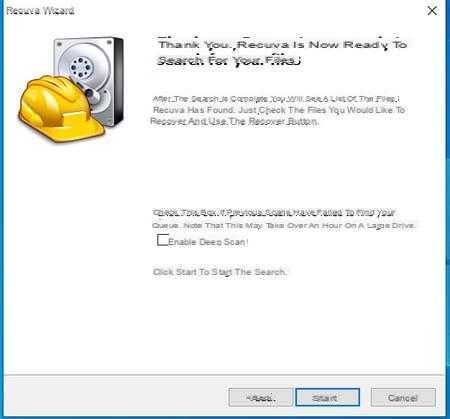
- If you want to do a deep disk scan, check the box Enable deep Scan. The operation will take longer - it can take more than an hour on large capacity disks… - but it may provide better results if you have allowed a little time to pass since your file disappeared. Finally click on Start.
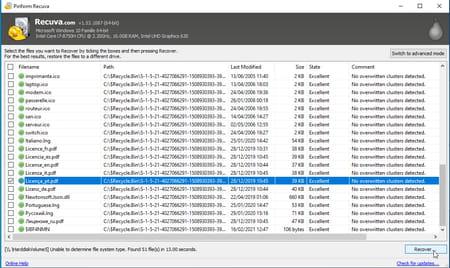
- Upon completion of the scan, Recuva presents a list of all the files it has found that are potentially recoverable. A green dot indicates that the affected file is in good condition. An orange dot means that it may be partially damaged. On the other hand, if the file has a red dot, it is seriously corrupted and cannot be recovered by Recuva.
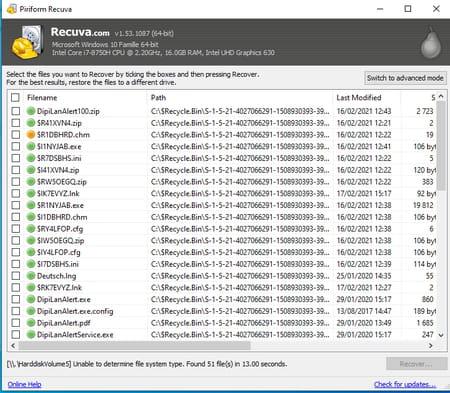
- Select the box next to the files you want to recover and then click on the button Recover lower right.
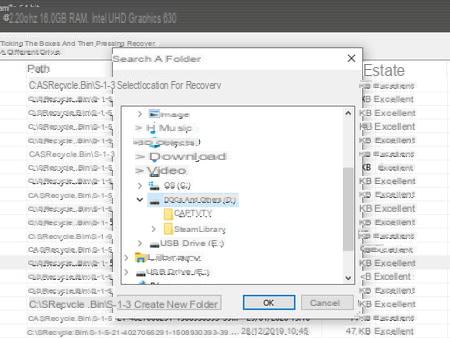
- Now select the volume on which to save the found files. Of course, do not choose the original disc, as this may overwrite your precious files. Opt for a second internal drive, an external drive, a USB drive, a memory card or even a shared drive on your network.
- At the end of the operation, you find the recovered files in the backup folder that you have defined.
How to Recover Data on Mac with RecoverX
Free and available in a portable version, Transcend's RecoverX adopts a simple and clear interface. We prefer it to other tools like OnTrackEasy, Stellar Phoenix or Wondershare RecoverIt both paid and all requiring installation.
- First, repatriate the portable version of RecoverX. If the data to be recovered is on the system disk (the one where macOS is installed), it is imperative to use another Mac for this step so as not to overwrite the files you want to get your hands on.
Download RecoverX for macOS
- Open the DMG file then copy the RecoverX application to a macOS Extended Journal formatted USB drive.
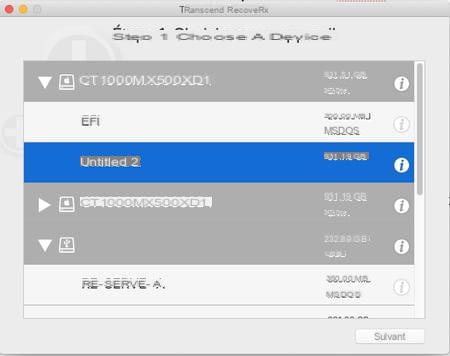
- Then connect the USB key to the Mac containing the files to be recovered. Launch RecoverX directly from the USB stick. In the window that appears, choose the drive to scan - the one that contains the files you want to recover. Then click on Next.
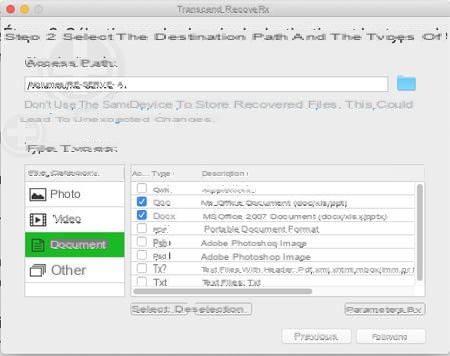
- You must now indicate the volume on which the recovered data will be saved. Of course, do not choose the original disc, as this may overwrite your precious files. Opt for a second internal drive, an external drive, a USB drive, a memory card or even a network shared drive. Click for that on folder icon at the end of the line under the Path section and choose the desired volume.
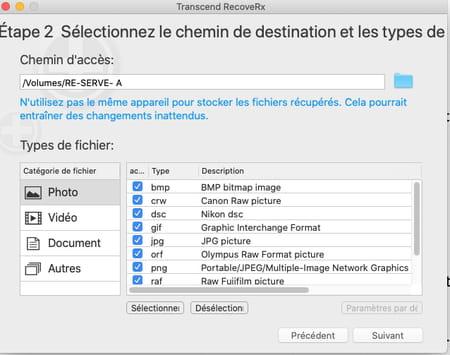
- Now decide what type of file the software should look for. They are divided into four categories: Photos, Videos, Documents, Others. Click on the button Selection to uncheck all the boxes of the file formats you do not want to recover. Navigate among the different categories and check boxes corresponding to the types of files you are interested in. Click on Next.
- The analysis starts. It can last from a few minutes to several hours depending on the size of the drive and the amount of data to be analyzed.
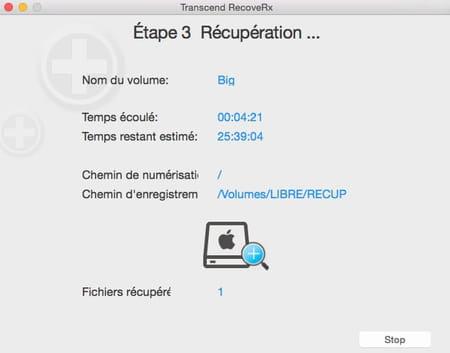
- At the end of the operation, you will find all the recovered files in the backup folder that you have defined.
Summary On Windows with Recuva On macOS with RecoverX No one is immune to mishandling. We think we are getting rid of a useless Word document, a duplicate photo or an uninteresting PDF, and ...