You just sent an important email to a company and you need to get a response as soon as possible. Precisely for this reason, since bothering the recipient is not among the options, it would be useful to know, at least, if he has read your email or not, so that you can adjust with the times.
How do you say? Your situation is exactly as I described it and therefore you would need to know how to put the read receipt on Gmail? Then I have good news: you have come to just the right place at the right time! Thanks to this tutorial, in fact, you will be able to learn how to put the read receipt for the emails you send via Gmail. There will be no more problems, therefore, regarding the fateful question that we all ask ourselves when we do not receive a sudden response to our emails: "Did he read my message?".
I would say that I have made enough premises, now it's time to get to work. Sit comfortably and take a few minutes to dedicate to this guide: you will learn how to put the read receipt on your emails, so as to take some thoughts out of your head. Having said that, I just have to wish you a good reading and a good job!
Index
- How to put the read receipt on Gmail
- How to put the read receipt on Gmail on smartphones and tablets
How to put the read receipt on Gmail
Before proceeding to explain yourself in detail how to put the read receipt on Gmail, I need to make you aware of some important information.
In fact, you should know that the standard and free version of Gmail does not offer the possibility to put the read receipt. In any case, all is not lost: you can still get it, using a method officially supported by Google, or another, in this case external.
The official option you can opt for is to use Google workspace (better known as Google Suite). This Google-branded service is made on purpose to better manage the online part of the work and offers various options and advantages, including the possibility of receiving a read receipt. The only problem with this method is that you need a business email address in order to create an account on Google Workspace, so it's not an option for everyone.
In case you can't use the above solution, you can consider installing browser extensions, which add a new button to the Gmail interface that shows, in fact, if the recipient of an email has read the message or not.
The downside of this second solution is that all such extensions currently available are unofficial; this means that, by requiring access to the Google account and the user's browsing data in order to function, they could entail potential privacy risks. My advice is to avoid them as much as possible; in any case, if you really can't do without it, I will shortly talk to you about one of these most renowned solutions, which should not represent particular risks (unfortunately, using the conditional is a must in these cases, as we are talking about solutions for which it is not possible to inspect the source code and then verify in detail the operation).
Google workspace
If you have decided to rely on Google workspace, Google's official solution aimed at professionals, let me introduce you to this service first.
Google Workspace is the new name of the service that was previously known as Google Suite and therefore offers the same functions as the latter. In case you don't know it, just know that it is great for those who own a company and need to be able to manage it better. It is available with various subscription plans.
- Business Starter - at the cost of € 4,68 per month, the package offers numerous features, including the creation of a corporate mailbox, the ability to organize video meetings with up to 100 participants and 30 GB of storage space available to the user on Google Cloud.
- Business Standard - at the cost of € 9,36 per month, the package, in addition to the functionality of the previous one, offers the possibility to create video meetings with up to 150 participants and to record them. In addition, the package offers 2 TB of storage space available to the user on Google Cloud.
- BusinessPlus - at the cost of € 15,60 per month, the package, in addition to the functionality of the previous one, offers the ability to create video meetings with up to 250 participants, along with the option to record them and monitor attendances. In addition, the package offers 5 TB of storage space available to the user on Google Cloud.
- Enterprise - the package, in addition to the features of the previous one, offers the possibility of creating video meetings with up to 250 participants, together with the option to record them, to monitor attendances and to eliminate background noise, to improve their quality. In addition, the package offers unlimited storage for the user on Google Cloud. To find out the price of the package, you need to contact the sales team via the official Google Workspace page.
In any case, be aware that Google Workspace also offers a free trial period from the duration of 14 days, during which you can test all the features of the service.
If you want to use Google Workspace to put the read receipt on Gmail, the first thing to do is to create an account on the site of the service. To do this, I refer you to my guide, in which I explain how to create a Google Suite account (as explained above, it is exactly the same service, but the name has been updated in Google Workspace).
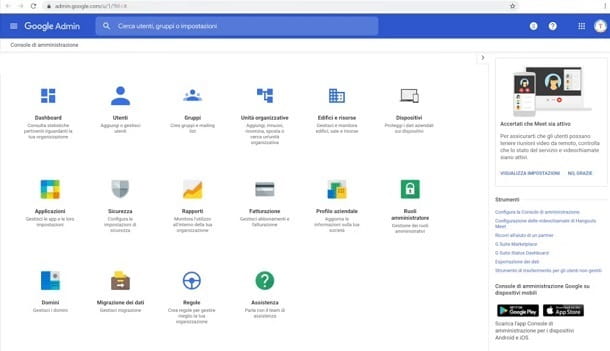
Now that you have a Google Workspace account, you can switch toactivation of the read receipt function on Gmail. To do this, you need to go to the Google Workspace administration panel, click on the icon uses and select first Google workspace and then gmail.
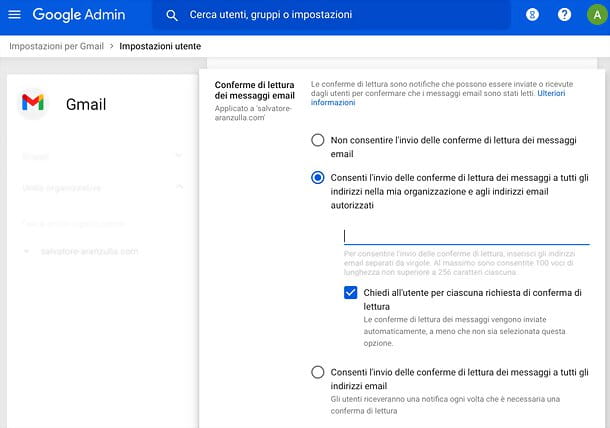
On the page you are taken to, press the item User settings, and locate the box named Read confirmations of email messages. Within the latter, click on thepencil icon, located on the right side of the box and then click on the item Allow message read receipts to be sent to all addresses in my organization and to authorized email addresses, or on the item Allow message read receipts to be sent to all email addresses, depending on your preferences. Then click on the button Save. By doing so, the setting will be activated on the Gmail account associated with the Google Workspace account.
Now that there are no more preliminary actions to do, then, to use the function of read receipt on Gmail, you need to go to the official Gmail site and log in with your Google account.
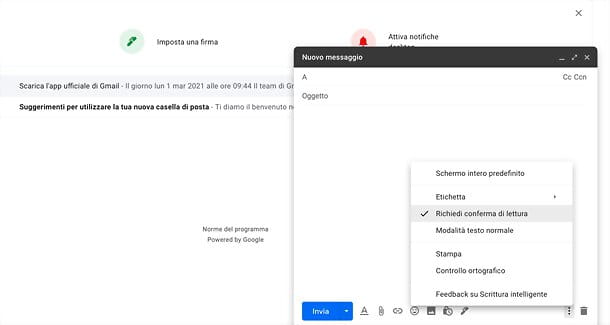
Now, for put the read receipt on Gmail, start by writing a new email. To do this, press the button Write, located at the top of the screen, on the left. Then fill in the message, inserting recipient, object e content of the message. Once this is done, you have to click onthree dots icon, located at the bottom right and, in the menu that appears, select the item Request read receipts.
That's all: now all you have to do is press the button Send to send the email. When the recipient has read your message, you will receive an email at the same email address you used to send the email, which will notify you that your message has been read by the recipient.
Mailtrack (Chrome)
If you want a free option that allows you to put read receipts on Gmail, then you might choose to use Mailtrack- This is a free extension for the Chrome browser.
Before explaining how to use Mailtrack, however, I would like to repeat, as explained in the previous chapters, that I do not recommend the use of extensions of this kind, as they are unofficial and therefore with potential risks regarding privacy and the sharing of own data with third parties. You have been warned!
That said, it's time to introduce yourself to the extension. This, in fact, offers three different packages, one of which is free. You can view them below.
- Free package - the package offers the basic functionality of activating the read receipt on Gmail, with the signature of the extension at the end of each email to which the function is activated. Furthermore, to activate the function in emails containing multimedia contents, the weight of the latter cannot exceed 3 MB.
- Pro package - at the price of € 9,99 per monththe € 59 per year, the package offers various features, including removal of the extension's signature, the ability to use it on smartphones and tablets, real-time notifications and the ability to schedule emails containing the extension's functions. Furthermore, you can activate the read receipt function in emails with multimedia contents inside regardless of their size.
- Advanced package - at the price of € 11,99 per monththe 71 € per year, the package offers all the features of the previous one, plus the possibility of using the function for advertising campaigns.
First, therefore, you must install Mailtrack. To do this, go to the extension's official website and then click on the button Install for Free. Doing so will take you back to the extension page on the Chrome Web Store. Premium, quindi, sul pulsating Add to Chrome and finally on the key Add extension.
When the installation is finished, a new web page will open, in which you will need to connect your Google account. Then click on the button Connect with Google and select the Google account you want to link to the extension (which will also correspond to the Gmail account). Finally, click on the button Allow.
Now that Mailtrack has been installed on your browser, you need to log into your Gmail account to use it. Then go to the official Gmail site and log in with your Google account.
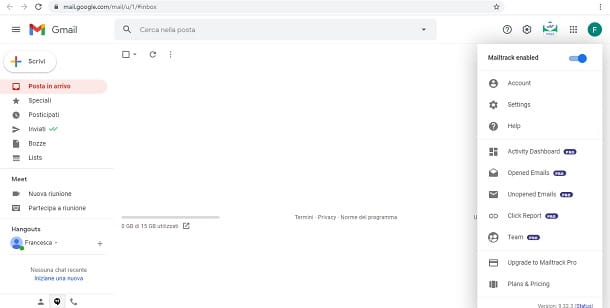
At the top right, you will immediately notice theMailtrack icon: by clicking on it, you can choose whether to activate or deactivate it, by clicking on the option Mailtrack enabled. By keeping the option activated, all the emails you send will have the extension's function to see the read receipt.
To see the extension in place, all you have to do is send an email immediately. Then press the button Write and fill in the fields of recipient,object and content of the email. When you have entered everything, click on the button Send.
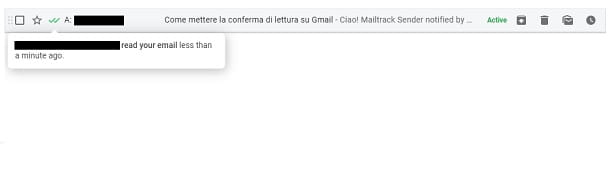
Now, to see if your email has been read, click on the item sent, located on the left side of the screen, to see all the emails you have sent with the Gmail account you are using.
You will immediately notice that, next to them, thedouble √ icon. If you have a white and a green √, the email has been sent. If, on the other hand, both √s are green, it means that the recipient has read your message. Simple, right?
How to put the read receipt on Gmail on smartphones and tablets

If you are looking to put the read receipt on Gmail on smartphones and tablets, I have to give you bad news: at the moment, there are no official methods to do this.
You could opt for the use of external applications, but I strongly advise against this, as, at the time of writing this guide, there are no applications that are reliable or that work properly. Therefore, I advise you to rely on Google Workspace on PC, as I explained to you in the previous chapters, to avoid any kind of problem.